• Call: +1 (858) 429-9131

DevOps stories 1: working with a high traffic e-commerce portal

Looks like this is a good idea to write down first person stories of various DevOps – Cloud migration scenarios that we come across.

In this particular case we have a beast of a server with 32 processors with 8 cores each & 256 of RAM running LAMP stack, CakePHP &  X-cart shopping cart. And yes, everything is dead slow.

Cleaning up the X-cart cache

By default (?), the cache is at /var/www/html/cache or [DOCTUMENT_ROOT]/cache. If there are too many files, you will not be able to delete the files. The following commands can help.


touch /root/agileblaze/cache-file-list.txt #empty file
find . -name '.js' | grep -vFf /root/agileblaze/cache-file-list.txt | xargs /bin/rm -f
find . -name 'sql.
' | grep -vFf /root/agileblaze/cache-file-list.txt | xargs /bin/rm -f
find . -name 'rf*.php' | grep -vFf /root/agileblaze/cache-file-list.txt | xargs /bin/rm -f

The permanant fix for this X-cart behaviour is to change the following row in the config.php file from:

define('USE_SQL_DATA_CACHE', true);
to
define('USE_SQL_DATA_CACHE', false);

MySQL

There are tons of issues like a db that is not upgraded, joins without indexes etc. We decided to make use of the RAM & have MySQL MYISAM temporary files in there for faster access. Don’t forget to create the required directory and add the necessary entries /etc/fstab to persist the changes over reboots.

/etc/my.cnf is changed as follows

tmpdir = /var/mysqltmp # changed from /var/lib/mysql/tmp

Now that we have some room to look into other matters, things should be easier.

We also had the non-so-friendly max connections error. We increased in the max connections from the default.

# MAX CONNECTIONS
max_connections = 300 #Sat Apr 30 03:35:25 CDT 2016

Slow Queries

If the slow query log is enabled, mysqldumpslow can be a very handy command

[root@714219-db1 mysql]# mysqldumpslow -a -s r -t 10 /var/log/mysql/slow.log

Reading mysql slow query log from /var/log/mysql/slow.log Count: 376687 Time=1.63s (613441s) Lock=0.00s (36s) Rows=203657.1 (76714970948), 2users@localhost SELECT productid, COUNT(remote_ip) AS total, AVG(vote_value) AS rating FROM xcart_product_votes GROUP BY productid

Controlling the RAM usage


The RAM usage on GNU/Linux based systems can be sometimes quite weird. The immediate path taken is to play around with sysctl and tweak swappiness & may be run drop_cache.

ie,

change swappiness to say, 10 & do a cache + buffer cleanup. But these may not be very handy but the /proc/sys/vm/vfs_cache_pressure changes seems to help further. (we have it around 512)

Further minimum free memory size is a parameter which can help preventing OOM errors. A sample value is shown below.

sysctl -w vm.min_free_kbytes=2621440

Further:

sysctl -w vm.vfs_cache_pressure=1024
sysctl -w vm.swappiness=10


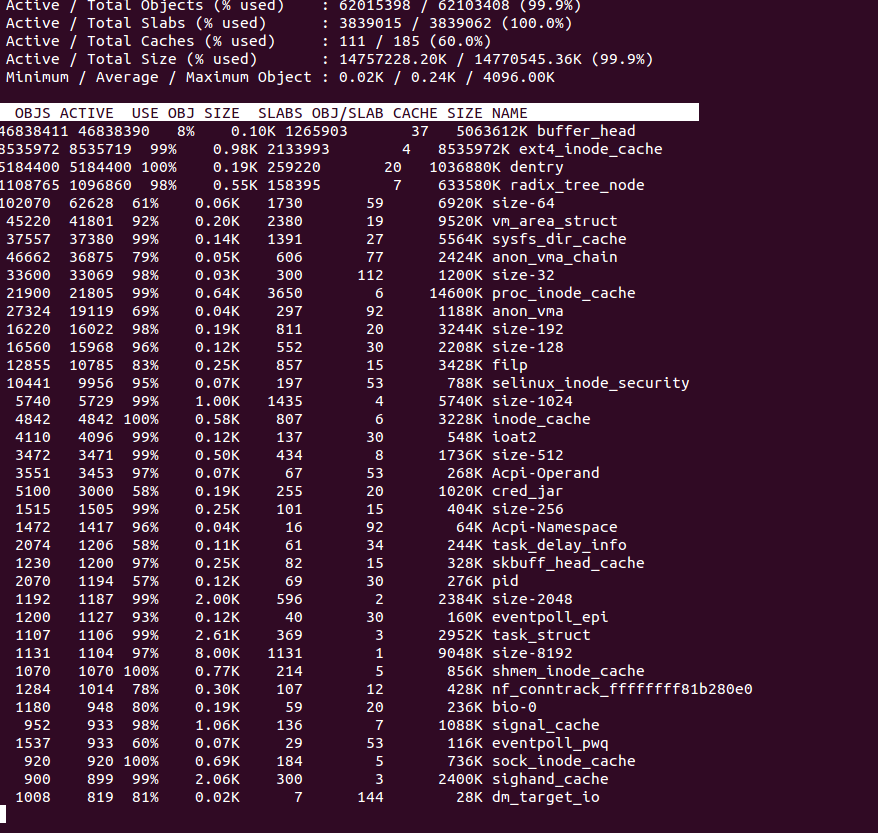
Keep an eye on Caches and Buffers

This is often something people miss.   The difference between free command and the total process usage can give us the Cache + buffer usage.  slabtop is a very handy command to get exact details.

slabtop --delay=10 -s c

Can give a neat summary.

Screenshot from 2016-05-11 20-28-07


Another very useful tool is dstat

dstat -lrvn 10 output is shown below. This can give colourful details of cache usage.

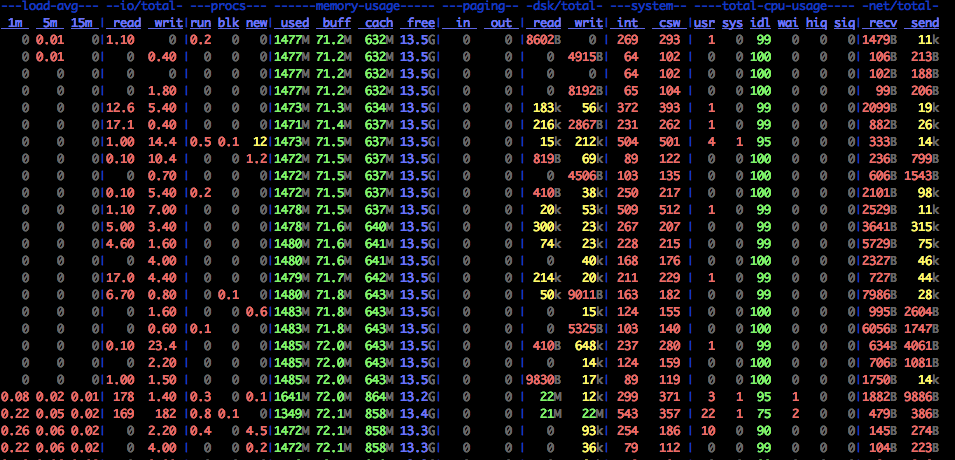
the memory, CPU, network, IO columns above gives useful information.


How to read dstat : On a fully warmed-up system, memory should be around 95% in-use, with most of it in the cache column. CPUs should be in use with no more than 1-2% of iowait and 2-15% system time.


How to setup automatic updates:

Sometimes it is quite good to have automatic updates in place. For Ubuntu, automatic updates can be done following these instructions.


Solr Error message – Caused by: java.lang.ClassNotFoundException: com.mysql.jdbc.Driver

Sometimes when we follow the default steps to install Solr the MySQL JDBC libraries are missed out and we end up getting the following error in the log files.


 Caused by: java.lang.ClassNotFoundException: com.mysql.jdbc.Driver


We can get things working by following these steps.


Install the missing libraries


apt-get install libmysql-java


Find the required Jar files by using the following command


dpkg-query -L libmysql-java


This will give an output like the following

/.
/usr
/usr/share
/usr/share/java
/usr/share/java/mysql-connector-java-5.1.38.jar
/usr/share/doc
/usr/share/doc/libmysql-java
/usr/share/doc/libmysql-java/copyright
/usr/share/doc/libmysql-java/README.gz
/usr/share/doc/libmysql-java/changelog.Debian.gz
/usr/share/maven-repo
/usr/share/maven-repo/mysql
/usr/share/maven-repo/mysql/mysql-connector-java
/usr/share/maven-repo/mysql/mysql-connector-java/5.1.38
/usr/share/maven-repo/mysql/mysql-connector-java/5.1.38/mysql-connector-java-5.1.38.pom
/usr/share/maven-repo/mysql/mysql-connector-java/debian
/usr/share/maven-repo/mysql/mysql-connector-java/debian/mysql-connector-java-debian.pom
/usr/share/java/mysql.jar
/usr/share/java/mysql-connector-java.jar
/usr/share/maven-repo/mysql/mysql-connector-java/5.1.38/mysql-connector-java-5.1.38.jar
/usr/share/maven-repo/mysql/mysql-connector-java/debian/mysql-connector-java-debian.jar


From the above, the two jars mysql.jar and mysql-connector-java.jar are the ones which is needed.

create a soft link to the library path of your solr installation. (in this case, /opt/solr-6.6.0 )


cd /opt/solr-6.6.0/server/lib

ln -s /usr/share/java/mysql-connector-java-5.1.38.jar  /opt/solr-6.6.0/server/lib

ln -s /usr/share/java/mysql.jar /opt/solr-6.6.0/server/lib


Add the relevant path to your solrconfig.xml


<lib dir="${solr.install.dir:../../../..}/server/lib" regex=".*\.jar" />

restart Solr & you are all set.


In some cases, you will get an error


Caused by: java.sql.SQLException: Illegal value for setFetchSize().

This can be addressed by adding batchSize=”-1″ to the data source declaration.


ie,


MySQL Optimization

Database optimization is the process of configuring database to use system resource efficiently and perform tasks quickly. To optimize mysql you should know the work flow of entire system, your hardware, operating system, disk I/O performance etc.
Why to Optimize
You can do more with less. The default mysql setup is optimized for a minimal system because it should work well on a minimal hardware. But when you use a dedicated mysql server with high traffic and complex queries you have to optimize mysql.
MySQL Server tuning Considerations
Here you will find some common optimization parameters.

  • MySQL variables
  • Hardware
  • Disk
  • Application

MySQL Optimization
MySQL global variables don’t have any predefined optimum values. It is a trial and monitor process. It depends on all the above parameters. Here you will see some of the common parameters.
Key-buffer-size
It is size of the buffer used to index blocks for MyISAM tables. On a dedicated mysql server with MyISAM storage engine 25-30% of systems total memory you can allocate for key_buffer_size. To fine tune key_buffer_size you can compare the variables key_reads and the key_read_requests.
This ratio should be at least 1:100.

SHOW STATUS LIKE ‘%key_read%’;
+——————-+————-+
| Variable_name | Value |
+——————-+————-+
| Key_read_requests | 10726813161 |
| Key_reads | 92790146 |
+——————-+————-+
Here the ratio is 1:115 which is acceptable.
But suppose you get a ratio 1: 10 then you need to add more key buffer and upgrade hardware accordingly.
Query Cache
“My website is too slow while loading dynamic pages”. If it is a mysql database related issue, following MySQL variables will be your solution.
query_cache_type
Set the query cache type. There are 3 values 0 ,1 or 2

0 Do not cache any query result
1 Cache query results.
2 Cache results ondemand. Cacheable queries that begin with SELECT SQL_CACHE.

query_cache_size
The amount of memory used to cache query result. Default is 0 which disable query cache.
The optimum value is depend on your application.
query_cache_limit
Do not cache results that are larger than this number of bytes. The default value is 1MB.
Status checking
SHOW STATUS LIKE ‘%qcache%’;
+————————-+———-+
| Variable_name | Value |
+————————-+———-+
| Qcache_free_blocks | 1 |
| Qcache_free_memory | 8371272 |
| Qcache_hits | 23547551 |
| Qcache_inserts | 46909131 |
| Qcache_lowmem_prunes | 5110536 |
| Qcache_not_cached | 2760196 |
| Qcache_queries_in_cache | 0 |
| Qcache_total_blocks | 1 |
+————————-+———-+
There were 46909131 queries and out which 23547551 queries cached and remaining not cached. Here the issue will either the result is greater than query_cache_limit or greater than query_cache_size itself. You have to trial and monitor 🙂
Qcache_lowmem_prunes.
When a query is removed from the query cache, this value will be incremented. If it increases quickly, and you still have memory to spare, you can set query_cache_size high, If it never increases, you can reduce the cache size.

sort_buffer
The sort_buffer is a useful for speed up myisamchk operations. It can also be useful when performing large numbers of sorts.

tmp_table_size

This variable determines the maximum size for a temporary table in memory. The maximum in memory size is minimum of tmp_table_size and max_heap_table_size. You can compare
Created_tmp_disk_tables and Created_tmp_tables to optimize tmp_table_size.

innodb_buffer_pool_size

This variable is target for innodb table and it is similar to key_buffer_size in MyISAM table.
On a dedicated mysql server using innodb you can set this upto 80% of RAM.
Hardware for mysql
If you have large tables(>3GB), you should consider 64 bit hardware as mysql uses a lots of 64bit integers internally.

You need more memory(RAM) if you want mysql to handle large number of connections simultaneously. More RAM will speed up key updates by keeping most of the pages in RAM

Another consideration is Ethernet device, You can use a 1G Ethernet for a dedicated mysql server for fast remote connections.

Disk performance is also an important parameter.
Disk Optimization
Striping disk (RAID 0) will increase both read and write throughput.

Don’t use RAID 1 or mirroring on disk for temporary files.

On Linux, mount the disks with async (default) and noatime.
Optimizing your application
Cache process in your application

Specify the column name in queries(eg dont use SELECT * FROM……)

Use persistent connections

USE EXPLAIN to explain!!.You will see detail below.

Queries and Indexes

Let us start with a simple query SELECT firstname FROM student WHERE id=’145870′;
MySQL start searching from the beginning row to find the student with id 145870. It does not even know it exist or not. An index is a sorted file which have an entry for each row.MySQL can find the corresponding record very quickly by referring this index.
EXPLAIN is a nice tool to understand your queries

EXPLAIN SELECT firstname,lastname FROM student WHERE id=’145870′;

+———-+——+—————+——+———+——+——+————+
| table | type | possible_keys | key | key_len | ref | rows | Extra |
+———-+——+—————+——+———+——+——+————+
| student | ALL | NULL | NULL | NULL | NULL |10000 | where used |
+———-+——+—————+——+———+——+——+————+
The possible_keys is null. In this case mysql will check all the 10000 rows. We can say this query(or table) is not optimized.

Now suppose we have use index for above table and run EXPLAIN again then we will get
+———-+——-+—————+———+———+——-+——+——-+
| table | type | possible_keys | key | key_len | ref | rows | Extra |
+———-+——-+—————+———+———+——-+——+——-+
| employee | const | PRIMARY | PRIMARY | 10 | const | 1 | |
+———-+——-+—————+———+———+——-+——+——-+
The type is “const”, which means that the table has only one matching row. The primary key is being used to find this particular record.

There are many more optimization variables and indxing methods. It is difficult include everything in a single article. But you can start mysql fine tuning while you database is underperfoming.

Microsoft SQL Server 2008 Encryption: Part l

Entrusted with a project where we have to implement data protection and privacy guidelines in accordance with international regulations we found ourselves investigating ways to implement data encryption in MSSQL database in Amazon EC2. We are deploying an application which has to deployed in all the AWS availability zones and our problems like syncing between zones are still at large as fine tune MS-SQL for the cloud.

Data security and privacy

The applications which storing sensitive information like customer information, Financial information, personal health information(PHI) etc, will have to meet certain data privacy and security acts. The Health Information Portability and Accountability Act (HIPAA) of 1996 protects health information. To make applications HIPAA compliance we can use some of new security features in SQL server 2008. MSSQL Server 2008 introduce new with security feature enhancements for powerful encryption and better key management capabilities

Data security in cloud

The data in cloud is in a shared hardware environment. Therefore data segregation is one of the major security issue. All cloud providers have their own storage management. But the security and privacy of data is again an issue because the customers don’t have much control over this storage area. They don’t know the exact location where data is stored. Customers can overcome these issues by implementing their own security features based own their application.

We had 2 issues to address:

1. Encrypt data in transit
2. Encrypt data at rest

In this one we are starting by implementing encryption of data in transit for MSSQL server. MSSQL Server uses the Secure Socket Layer(SSL) to encrypt data transfer between SQL server and applications. This encryption will ensure secure data transmission over the network. This is much more important when application and database are distributed on many AWS availability zones.

Implementation of SSL

1.Creating a self-singned cert using makecert

[text]
makecert -r -pe -n “CN=SERVER-FQDN” -b 01/01/2010 -e 01/01/2015 -eku 1.3.6.1.5.5.7.3.1 -ss my -sr localMachine -sky exchange -sp “SSL Providerl” -sy 12 c:\testssl.cer
[/text]

2.Install this cert

Copy c:\tesssl.cer into your client machine, run c:\testssl.cer from command window, select “Install Certificate”. -> click “Next” -> select “Place all certificates in the following store” –> click “Browser” -> select “Trusted Root Certification Authorities” -> select OK and Finish

3.Open SQL Server Configuration Manager

Expand SQL Server Network Configuration, right-click “Protocols for MSSQLSERVER” then click “properties”. On the “Certificate” tab select the certificate just installed . On the “Flags” tab, set “ForceEncryption” YES.

Now SSL is ready to use on server. You have modify your connection string to use SSL.

For Example

connectionString=”Data Source=db.server.com;Initial Catalog=mydb;User ID=user1;Password=pas@123;Encrypt=true;TrustServerCertificate=true”

You are Done!

Microsoft SQL Server 2008 Encryption: Part ll

In our first article we had discussed security and privacy of data in cloud and how to meet MSSQL server HIPPA(Health Information Portability and Accountability Act) compliance. We had also learn how to encrypt data in transit between MSSQL server and applications. Here you will learn how to encrypt data in rest in MSSQL using Transparent Data Encryption(TDE).

It seems that most of the security products focused their effort on securing data in transit only, using SSL/TLS. But when you build a security system that meet the international security regulations and acts, you need to encrypt data in rest also. The insecure configuration of server, operating system, firewall and network in general, will make it easier for some one to gain access to data at rest.

TDE performs real time encryption and decryption of data while writing and reading data from MSSQL. As the name implies encryption is transparent, that is no need to modify code or architecture of applications when implementing TDE.

Implementation of TDE

1. Create a master key
A master key is a symmetric key that is used to create certificates and asymmetric keys.

[sql]
USE master;
CREATE MASTER KEY
ENCRYPTION BY PASSWORD = ‘<password>’;
GO
[/sql]

2.Create Certificate

Certificates can be used to create symmetric keys for data encryption or to encrypt the data directly. Execute the following script to create a certificate:

[sql]
CREATE CERTIFICATE TDECert
WITH SUBJECT = ‘TDECertificate’
GO
[/sql]

3.Create a Database Encryption Key and Protect it by the Certificate

1.Click object explorer in the left pane of the MSSQL SERVER Management Studio
2.Right Click on the database which you want to encrypt
3.Click Tasks and Navigate to Manage Database Encryption
4. Select the encrytion algorithm (AES 128/192/256) and select the certificate you have created
5.Then Mark the check Box for Set Database Encryption On

You can query the is_encrypted column in sys.databases to determine whether TDE is enabled for a particular database.

[sql]
SELECT [name], is_encrypted FROM sys.databases
GO
[/sql]

Important Back up the certifi cate and private key to a fi le to ensure recoverability as follows

[sql]
BACKUP CERTIFICATE TDECert TO FILE = ‘C:\TDECert.cer’
[/sql]

You are Done!!